Super easy, last minute dessert... no baking and basic ingredients! This recipe is easy and fast, but very rich and habit forming. Everyone I have made this for has fallen in love with it!

I don’t know any child who wouldn’t like it, but besides kids, adults love this delicious cake too. When I don’t have time to actually bake something this is my best alternative. I make this Crackers Cake in two flavors: Chocolate-Vanilla and Cherry-Vanilla flavor. Now I always say pick your taste because that will define which will be your favorite one.
Ingredients:
One of Premium Plus Unsalted Crackers
1 box French Vanilla Pudding - instant
1 box Chocolate Pudding - instant
1 liter milk
1 liter of Whipping Cream
4 tablespoon of powder sugar
Preparation:
Prepare the pudding by following the directions on the packaging. Let it stand until you beat the whipping cream. Mix the 4 tablespoons of powder sugar into the whipping cream. Mix well. Beat with an electric mixer on high speed until well down. Pour half of the whipping cream into the Chocolate pudding and half into the Vanilla Pudding. Stir well.Use a glass dish for better results.
Step 1: Spread a layer of crackers on the bottom of the dish. Spread the vanilla mix over the crackers.
Step 2: Spread another layer of cracker. Spread the chocolate mix over the crackers.
Step 3: Repeat Step1
Step 4: Repeat Step 2
When finished place it in the fridge to chill for at least 3-4 hours. The crackers have to soften to really enjoy this cake. I usually leave it for overnight. Enjoy!
Read more...
This is one of the easiest summer snacks for your whole family. If you would like something fresh and fast, this raspberry mousse will be just the perfect dessert. Ingredients:
1 egg white
1/2 cup of white sugar
1 cup of raspberries, washed and well drained
Preparation
Place the egg white into the mixer and mix on a high speed. After a minute, add gradually the sugar. Mix for 2 minutes and gradually add the cup of raspberry. Continue to mix until the mixture becomes really thick.
Serve in individual serving bowls. Place it in the fridge for about 2 hours to chill. Serve plain or with angel cake.  Read more...
Ingredients:
4-5 pounds of potato
One dozen of eggs
1 Pair of Hungarian Smoked Sausage
3 Sour Creams
Some milk
Sea salt and ground black pepper to season
Preparation: 1. Under running water scrub the potatoes well. Do not peel. In a large pot cook the potatoes. When it’s cooked drain and let it cool. After it cooled off, peel the potatoes.
2. In a smaller pot boil the eggs for about 15 minutes. Drain the water and let cold water running over for few minutes (it helps to remove the eggshell easier).
3. Use a medium size glass casserole. This dish serves 8-10 people. On the bottom of the dish layer thinly sour cream. (I always mix the sour cream with milk to be softer. It’s easier to work with it). Slice half the potatoes into quarter-inch thick slices and layer them in the dish. Season with sea salt and ground black pepper. Cover with one layer of sour cream.
4. Slice the eggs into quarter-inch slices and layer them over the potatoes. Season with sea salt. 5. Slice thinly the sausage and layer them over the eggs. Cover with a light layer of sour cream.
6. Slice the remaining half potatoes into quarter-inch thick slices and layer them over the sausages. Season with sea salt and ground black pepper. Cover the potatoes with the last layer of sour cream.
7. Put the dish in the oven and heat oven to 350 degrees F. Do not preheat the oven to prevent the glass dish to explode. Bake for about 30 minutes or until you can see that the sour cream is boiling. When remove the hot glass casserole dish from oven, place the dish on a wood server, again to prevent any glass explosion. (Even the best quality glass dishes after a while will wear off and when cooking in glass dishes make sure that you don’t change the temperature drastically. I had one unpleasant experience and since then I am more careful). Serve hot. You can have bread with or just enjoy the dish as it is. I love to serve with some kind of salad. Like tomato salad or roasted pepper.
For Step-by-steo picture guide check out the album:
Read more...
This is an easy and fast recipe. I really believe you just can’t blow this one. My kids ask me over and over to do this cake for them. When they have their friends over instead of baking cupcakes I bake them this. My twin boys (they are 9 years old) can already bake this cake with my supervision.
 Ingredients:
250 grams of Butter of Margarine
350 grams of sugar
1 teaspoon of baking powder
2 tablespoon of lemon juice
2 whole eggs
250 ml milk
1 ½ -2 cups of flour
1-2 cups of chocolate chip
Preparation:
1. Preheat oven to 350 degrees F (175 degrees C).
2. Mix the butter with the sugar until smooth. Add the baking powder and the lemon juice and stir. Add the eggs and stir well. Add the milk and slowly stir together until smooth. Then add flour and mix well.
3. Line the bottom of a 14x10-inch square pan with aluminum paper foil. I never grease the pan. I just line the aluminum foil and at the end I peel of the foil. But if you like to grease the pan, then go ahead grease the bottom of the pan and/or dust lightly with flour.
4. Pour the mixture in the pan and sprinkle the chocolate chip over the mixture. With your hand slightly push the chocolate chip into the cake mixture. Bake at 350 degrees F (175 degrees C) for 25 minutes or until cake springs back when lightly touched. Remove from pan and allow it to cool.
My best advice: to use a toothpick to check the cake if ready or not. After 20 minutes when you think the cake is ready remove the pan from the oven and push a toothpick in the cake. When you remove the toothpick and is clean the cake is down. If you over bake the cake will be dry.
Read more...
This is one of my favorite recipes from my childhood. I can still remember when my mom used to grill the eggplant in a pan (in those year we had no BBQ) and I helped her peeling the eggplants. Being a child it was fun to play with the vegetable and squeeze out the juice from it. I loved eggplant spread since I was a kid. It was one of the first foods what I prepared by myself at an early age, because I loved it. Today my whole family likes this recipe. My kids will even pick eggplant spread over Nutella (and trust me they love Nutella on bread).  Ingredients:
3-4 Medium Size Purple Eggplants
½ Onion
2-3 Tablespoon Lemon Juice
3 Tablespoon Extra Virgin Olive Oil
3-4 Tablespoon Mayonnaise
1 Teaspoon of sea salt
Preparation:
Wash the eggplants and with a paper towel wipe it dry. Preheat the BBQ and when warm enough place the eggplants on the rack. On medium-low heat, roast the eggplants until ready. Remove from the BBQ rack and let it cool. Peel of the eggplant’s skin and let it drain for about 2 hours. We don’t need the eggplant juice, because we don’t want the spread to be watery.
When there is no more juice dripping, with a mixer mix the eggplant and the half onion, until smooth (some like it to be totally smooth, even the seeds. I like to keep the seeds in the spread). When the onion and eggplant is smooth add the olive oil and stir. Season with sea salt and add the lemon juice. Stir together, then add the mayonnaise and stir together.
For a healthier spread use only olive oil. Then you’ll have to add more olive oil to the spread. I like it with mayonnaise too, but don’t over do it. When you add the ingredients taste to see how you like it.
Refrigerate for few hours and serve. For step-by-step picture guide check out the album:
Read more...
Ingredients:
3 whole eggs
half medium size red onion sliced
half red bell pepper sliced
1 tablespoon of coconut oil
Sea salt and ground pepper
Hot Peppers
Preparation:
In a frying pan sauté the onion and pepper for 2-3 minutes. Scramble the eggs and add to the sautéed onion and pepper. Stir together until eggs are down. Season with sea salt and ground pepper and serve immediately.
Read more...
 Ingredients:
1 medium size onion finely chopped
1 lb fresh yellow string bean, trimmed
1 lb fresh green string bean, trimmed
1 cup mini carrots
3 tablespoon olive oil
1tablespoon ground Hungarian red paprika
1 tablespoon of sea salt
1 cube Knorr Chicken Cube
3-4 tablespoon of flour
300 ml of milk,
4-5 tablespoon of vinegar
Ground pepper for seasoning
2 tablespoon of finely chopped Italian parsley
Preparation:
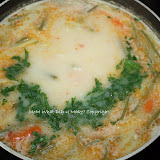
1. In a large pot heat the olive oil and sauté the onion for few minutes. Add the paprika and stir. Add the yellow and green string beans, mini carrots and sauté for 2 more minutes. Cover with water and add the sea salt, chicken cube and ground pepper and bring soup to boil. Cover and on medium heat cook for about 30 minutes or until beans are soft.
2. In a small bowl mix the 4 tablespoon flour with a little milk to evenly smooth the texture. Then add the rest of the milk and stir.
3. When beans are soft, bring the soup to high heat position and under continued stirring add the flour-milk mixture to the soup. Stir continually until the soup is back to boiling. After few minutes reduce the heat and add the vinegar. Remove from heat and add the finely chopped parsley.
Serve with whole wheat bread or French bread.
For step-by-step picture guide check out the album
Read more...
This chicken salad is one of my favorites and my family loves it as well. Ingredients:
6 oz. chopped cooked chicken
1 tablespoon organic mayonnaise (or you can add organic reduced fat sour cream)
1 tablespoon flaxseed oil or garlic-chili flax
Half chopped sweet onion
Half tablespoon chopped red bell pepper
3 tablespoon chopped celery
Preparation:
Combine all ingredients and serve over lettuce or spinach. Today I served it in a whole wheat wrap with mixed organic salad and 3 hot peppers.
This recipe serves 2 people. I always do at least double portion so I will have it the next days. Enjoy!
Read more...
Its summer time and we like to get together and enjoy a great BBQ. Often we go for hamburgers or hot dogs because they are faster to prepare. I live in a house with 4 men, and they love real meat. We love all kinds of meat, but the boy’s favorite is the T-Bone Steak.  T- Bone steak consists of a T-shaped bone with meat on each side. The larger side contains meat from the strip loin (or New York strip), whereas the smaller side contains the beef "tenderloin". Due to their large size and the fact that they contain meat from two of the most prized cuts of steak, T-Bones are generally considered one of the best valued quality steaks available.
There is a secret on how to do a steak to keep its juice and tenderness, but to cook it throughout, so you’ll not have a raw meat on your plate.
1. The first step is to buy a thick, about 2 cm thick steak and marinate the meat over night. Choose your kind of marinate sauce or make your own marinade sauce and marinate the meat overnight. I always marinate the meat at least 15-24 hours before I’ll BBQ.
2. Preheat the BBQ in advance and keep the heat on medium. The worst you can do is to overheat the BBQ, as it will burn the outside and let the inside uncooked.
3. Place the meat on the rack and cook it for about 15 minutes each side. Flip the meat only once. Cover the grill to cook the steak to your desired "doneness'. Covering the BBQ grill briefly will allow you to cook the steak to medium or well done without burning. Test for doneness with your finger, or thermometer. If you want your steak to be juicy do not flip it over again and again. Serve hot!

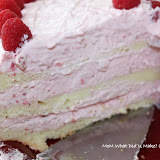
It's strawberry and raspberry season. One morning I wondered if I would mix this with with this what would that taste? So I baked my creation and the reaction on the faces of those who tried the cake was a pleasant one. Many of you asked for the recipe, so I decided to do it all over again, write down and share the recipe. Strawberrie - Raspberry Sensation Cake Ingredients:For the cake:
8 Whole eggs 8 Spoons of white sugar 8 Spoons of baking flour ½ Tea Spoon of Baking Soda For Filling:
5 Spoons of white Sugar 800 ml of milk 2 Strawberry or Raspberry Cooking Pudding Powder (I use Dr. Oetker pudding) 1 Cool Whip 1 Cup (400 grams) of finely chopped strawberries 1 Cup (400 grams) of raspberries Preparation:1. Divide the 800 ml of milk into two: a) In a small pan pour 500 ml of milk and 5 Spoons of sugar and bring to broil. b) In a glass-bowl pour the remaining 300 ml milk and pour in the pudding powders and mix until smooth. When the milk starts to boil (a), add the mixture (b), reduce heat and stir until the pudding becomes evenly smooth. When you see the firs bubble the pudding is ready. Cover and let it cool. 2. Preheat oven to 350F. Separate the egg yolks from egg whites. Use an electric mixer on high setting to beat the 8 egg whites with 6 spoons of sugar. In a bowl stir the 8 egg yolks with 2 spoons of sugar and ½ teaspoon of baking soda. Stir until smooth. When the egg whites are well beaten, add the egg yolk mixture and stir on low setting, just smoothly stir together. Then gradually add 8 spoons of flour and smooth together on low setting. Pour mixture into a 15” X 11” square pan or a round 8.5” diameter pan. (I always place a sheet of aluminum foil into pan to eliminate sticking). Bake for 20 minutes on top. 3. When pudding is totally cooled, use the electric mixer on a lower setting to smooth pudding for 2 minutes. Add cool whip gradually and stir until smooth. Add the strawberries and stir. Add raspberries and on high setting stir for about 3-5 minutes until raspberries are dissolved into the mixture. 4. Cut the cake in half (if you’ll make the round form then cut the cake into 3) and fill with the filling. Cover the top layer with filling too. Decorate with fresh fruit. Let it stand over night in fridge. Enjoy. Preparation time: about 2 hours. The round cake serves 16. The square pan serves more as you can cut into smaller pieces. If you have a gathering with more people then it’s better the square option. For a nice cake and less guests choose the round form. It looks better. Enjoy. For step-by-step picture guide check out the album
Read more...
When string beans are plentiful there is nothing like eating them right off the vine. My grandparents grew loads of beans and I used to love the juiciness of fresh beans. In summer months when it's hot, I just loved them for snacks. I still eat them fresh. I have few recipes with string beans. Now I would love to share this light and tasty colorful one.  Ingredients:
1 lb fresh (or frozen) green or yellow or mix of both, trimmed
1 Tablespoon extra virgin olive oil
2 Tablespoon sesame seed
1 cup of mini carrots
Sea salt, fresh ground pepper
Preparation:
1. In a large saucepan, bring 2 L salted water to a rolling boil. Add fresh (or frozen) beans and cook until they just turn color – about 5 minutes. (I used frozen beans with mini carrots). Don’t over cook the beans; you want it to be still crispy. Drain the beans and place them in the cold water bath. Drain again and place on a layer of paper towel.
2. In a large skillet, heat olive oil over a medium heat. Add sesame seeds and roast for few minutes until the seeds start to change color. Add drained beans and sauté for few 1-2 minutes. Season with sea salt and black pepper. Serve immediately.
Read more...
My husband loves tomatoes. Its his favorite vegetable and he eats tomatoes daily. Never gets tired or bored having tomatoes again. This is his favorite tomato salad. Ingredients:
4-5 Big Red Wine Tomatoes
1 Big Red Pepper
Half Spanish or Red Onion
Preparation:
Slice the tomatoes, peppers and onion. Sprinkle with sea salt, balsamic vinegar and extra virgin olive oil. Let stand for 30 minutes in fridge before serving. Enjoy.
Read more...
Ingredients:
1 medium onion, peeled and finely chopped
3 parsley roots, peeled and cut into chunks
6 medium carrots, peeled and sliced
1 pound of pork tenderloin (you can use chicken breast too) – cut in bite sizes
Half can of sauerkraut,
2 ribs celery, whole and washed
1 cup of green peas
1/2 head of cauliflower, trimmed and chopped
3 stems of lustean (it’s a plant and the leaves of the plant is used as spice).
Sea salt and ground pepper
Preparation: 
In a medium saucepan heat 2 tablespoons of coconut oil and sauté the onion until just golden. Add the parsley and carrot to the saucepan and sauté for few minutes. Add the meat, stir together and cover. Cook for about 5 minutes. Add the sauerkraut, stir together and season with sea salt and ground black pepper. Add the celery ribs and the leustean (if you don’t have the spice just leave it out). Cover with water and cook until meat is almost ready and the carrot is tender. Add the green peas and the cauliflower and cook for 10 more minutes. Enjoy! If you like sour cream you can add one tablespoon of sour cream.
Read more...
Who Am I?
I would like to take a few moments to introduce myself to my readers just because some of you might be interested to know who is behind this blog. I often find myself checking out who is the writer behind a book, the designer behind a fashion style, the architect behind an amazing architectural building, bridge or tower, the painter behind a unique work or the parents who raised a well behaved and polite kid. As more I know about the person, the better I can relate to him/her and I can understand more the reason behind the work.
My name is Piri D. and I’m in my mid thirties, happily married and mother of three handsome, full of energy, never stopping boys. I was born in Europe in a Hungarian speaking family. My mom thought me in my early years about cooking, as in our tradition the cooking is a woman’s choir. I remember the first times being in the kitchen and listening to my mom’s instructions what to do and how to do it. I wanted to do everything different. Since grade 9, I remember going home from school and cooking before my mom would arrive home from work. I loved to cook on my own, just because I had the chance to try new things. (Sometimes if the food didn’t work out perfectly I would just throw it in the garbage or down in the toilet.)
Over the years we left Europe and settled in Canada. For me cooking is a part of entertaining those whom I love. I love to have company and I loved to cook them. I never really thought that I am good at cooking. It was just the “thing” I always did since I can remember, but I could tell over the years that my cooking was welcomed and appreciated not just by my family members, but rather from our guest too.
Why this Food Blog?
Bloging wasn’t something I was interested for a long time. I liked to read blogs, being far away from my family, some of my friends and relatives wrote their blogs and I loved to read them as a way to keep in touch, see kids grow and being more involved in their lives.
But over the years, over and over I had to write down my recipes to my friends because they were asking for it so I decided to have a food blog where I will share my recipes which came from a various source like: cookbooks, my parents, grandparents, other family or friends, my own creations and experiments. If I prepared the recipe from a cookbook I will most certainly recommend the book it came from or if it’s an online source then I link to the online source.
What’s behind the name?
I have three boys as I mentioned. Every day when they come home from school the first question is: MoM What Did U Make? They're always hungry (especially my teenager) and when they walk in the house they try to find out what did I made by the flavour and aroma of the food.
This is a whole new step for me, but I would like to share my passion and love for cooking. This will be a great way to let those interested in trying new recipes to just experience with my recipes too.
Other Interest
Besides my passion for Food and Cooking I am learning more about health and wellness. Exercise becomes more and more important in my daily life.
When I work - I work as a Social Media Marketing and Search Engine Optimization Expert. My primary goal is to help enterpreneurs and executives take their business to the next level through strategic implementation of Online Marketing. It is crucial for every business to have top-notch presence online and I LOVE being a part of a company's success.
I love photography, I always loved since I had my first son. In our family I’m the one running around with my camera in my neck. I’m rarely in any pictures, but love to capture shots that speak a thousand words, that makes one feel as if they were a part of the scene and experience the photo with their senses. I am still learning on this field, but is something I love to do.
Decoration is another part of my life. I love to walk in a room and see what could be. In my mind I always create something. Reorganizing a room, a family’s financial future or mixing different ingredients to experiment a new recipe for me it’s the same.
Last but not least God is a big part of my life. He made me the person who I am and every time I sit down I pray. English is my second language and to be able to write I need God’s help on a daily basis. I would never be the person who I am without God’s grace. He made me with this desire to create. My desire is to honor Him with all I do and say, even with this blog.
This blog is a venue for your contribution. We welcome your participation. Feedbacks and constructive criticisms are always welcome. If you enjoy my blog, please visit often, and leave your comments or you can subscribe to my blog and receive all my updates easily to your RSS readers or emails. If you have any comments or requests to improve this site, please feel free to pass them on.
My Warmest Regards,
Piri D.
All photographs and written content on MoM What Did U Make? © 2009 MoM What Did U make? All Rights Reserved. Please Ask First if you are interested in using my texts or photographs!
Read more...
Copyright/Photography
Copyrights exist for all (including the photography) material found on this blog, and law expressly prohibits any changes or revisions. All content on this blog, including the photography, is my work, which means it is copyrighted with All Rights Reserved.
However, my copyrights mean, “you have the right to copy, so copy it right!” Please ask first BEFORE republishing or distributing any of my work! If you are interested in using my texts or photographs please contact me. You may not use my work for commercial purposes without my permission. Please feel free to copy and print out any material that’s “readable” for personal use only (but not for sale). If you would like to send one of my recipes to your friends please just e-mail them a link to the page.
Also, please do not republish our content on the internet as this hinders our work in the search engines - instead please link to the content you like (that actually helps us get better positions in the search engines). The photos you see on my blog are not free for the picking to be republished in any form. If you do link to us please drop us an email so we will know. Thanks for honoring this request.
How to link to a page or a recipe?
When you click the title of an article, it will open up with the comment option at the end of the article. Under the comment box there is a "create a link" option. Just click on it and the link will open in a new window. Just copy with and past in your website page.
Recipes
The recipes you find on my blog are all put together with love and a lot of passion. The sources of my recipes are various - a cookbook, my parents, grandparents, other family or friends, my own creations and experiments. I will never copy a recipe verbatim. Often I have modified a recipe and almost always post my version of it. If I prepared the recipe from a cookbook I will most certainly recommend the book it came from or if it’s an online source then I link to the online source. I do take time to post these recipes and often my experimentations are a matter of taste - ours.
My Advertising Policies & Sources of Revenue
Maintaining a blog is a difficult job - no doubt about it. When I started my online weight-loss journey I didn’t really realized that this will take more time then just writing few sentences on a paper base food journal. When I sit down to create a post it is a process of many steps. Make the food, take pictures sometimes for a step by step guide or at the and when the food is ready (my family sometimes is asking: “can we eat and then you make the pictures”), then I write down my thoughts what I would love to share with you. What I learned, experienced or realized over the period of my weight-loss journey.
In order to cover these costs, I decided to run some ads on my blog to support a few minor costs the blog generates. I am not getting rich from it but it helps to cover a percentage of the costs for supplies and material. This may take the form of pay per click text ads in towers or banner display ads on various pages. I may also display videos, with attached ads, or articles with embedded ads. The visitor has the choice of clicking on these ads, or not, (at no charge to them), if they are interested in the offers these companies provide. I make every effort to filter out ads not relevant to the site or its visitors.
I also link to websites I am an affiliate of, like Amazon.com, for the same reason. So, if you follow those links you will be supporting my blog. A tiny percentage of the purchases come my way - and I mean really tiny. But I do thank you for the support.
If you would like to advertise or sponsor this blog please drop me an email
As a general rule I don’t recommend anything on this blog that I am not convinced about or do not like personally. Most of my recommendations are of items I have personally tried and thought it is worth mentioning to inform my readers.
Comments:
Commenting is the most important feedback for me. I appreciate all your comments and make sure to read every single one of them. Unfortunately, I am unable to always reply to every single one individually.
Read more...
Privacy Policy for MoM What Did U Make?
The privacy of our visitors to MoM What Did U Make? is important to us. At MoM What Did U Make? , we recognize that privacy of your personal information is important. Here is information on what types of personal information we receive and collect when you use and visit this site, and how we safeguard your information. We will not use, market, solicit or distribute any of your information for marketing purposes of any kind. MoM What Did U Make? is not responsible for the practices of any other outside company linked to this website.
Log Files.
As with most other websites, we collect and use the data contained in log files. The information in the log files include your IP (internet protocol) address, your ISP (internet service provider, such as AOL or Shaw Cable), the browser you used to visit our site (such as Internet Explorer or Firefox), the time you visited our site and which pages you visited throughout our site.
Cookies and Web Beacons.
We do use cookies such as Google's DoubleClick DART cookie to store information, such as your personal preferences when you visit our site. This could include only showing you a popup once in your visit, or the ability to login to some of our features, such as forums.
We also use third party advertisements on MoM What Did U Make? to support our site. Some of these advertisers may use technology such as cookies and web beacons when they advertise on our site, which will also send these advertisers (such as Google through the Google AdSense program) information including your IP address, your ISP , the browser you used to visit our site, and in some cases, whether you have Flash installed. This is generally used for geotargeting purposes (showing local real estate ads to someone in our area, for example) or showing certain ads based on specific sites visited (such as showing cooking ads to someone who frequents cooking sites).
You can choose to disable or selectively turn off our cookies or third-party cookies in your browser settings, or by managing preferences in programs such as Norton Internet Security. However, this can affect how you are able to interact with our site as well as other websites. This could include the inability to login to services or programs, such as logging into forums or accounts.
Read more...
This blog is a venue for your contribution. We welcome your participation. Feedbacks and constructive criticisms are always welcome.
If you enjoy my blog, please visit often, and leave your comments or you can subscribe to my blog and receive all my updates easily to your RSS readers or emails.
If you have any comments or requests to improve this site, please feel free to pass them on. If you have a special recipe and you would like to share with me or others on my blog please contact me via e-mail with pictures and I will post the recipe with your name. Thank you for your contribution.
You can leave a comment on the Comment Box or you can contact me via E-mail Me
My Warmest Regards,
Piri D.
All photographs and written content on MoM What Did U Make? © 2009 MoM What Did U make? All Rights Reserved. Please Ask First if you are interested in using my texts or photographs!
Read more...
Copyright ©2009, MoM What DiD U Make? - ALL RIGHTS RESERVED. Check out my Copyright Notes before republishing or distributing any of my work! If you are interested in using my texts or photographs please contact me.
|